Tutorial - 5G Network Setup with COTS UE
Introduction
These are the generic instructions to set up a 5G network using Open5GS and srsRAN. An Ettus X310 USRP and a Pixel 8 phone are used.
Prerequisites
- Host machine running Ubuntu
- UHD SDR like Ettus X310 USRP
- Android Pixel 8 phone
Note that other Android devices work as well but are not tested by ourselves. For details check the srsRAN documentation.
5G Core installation and configuration
Follow the installation procedures in the Open5GS Quickstart guide.
Step 1: Install the 5G Core (Open5GS)
We recommend installing for Ubuntu 22.04 with the following instructions:
Getting MongoDB
Import the public key used by the package management system:
sudo apt update
sudo apt install gnupg
curl -fsSL https://pgp.mongodb.com/server-6.0.asc | sudo gpg -o /usr/share/keyrings/mongodb-server-6.0.gpg --dearmor
Create the list file /etc/apt/sources.list.d/mongodb-org-6.0.list for Ubuntu 22.04:
echo "deb [ arch=amd64,arm64 signed-by=/usr/share/keyrings/mongodb-server-6.0.gpg] https://repo.mongodb.org/apt/ubuntu jammy/mongodb-org/6.0 multiverse" | sudo tee /etc/apt/sources.list.d/mongodb-org-6.0.list
Install the MongoDB packages.
sudo apt update
sudo apt install -y mongodb-org
sudo systemctl start mongod (if '/usr/bin/mongod' is not running)
sudo systemctl enable mongod (ensure to automatically start it on system boot)
Install Open5GS
sudo add-apt-repository ppa:open5gs/latest
sudo apt update
sudo apt install open5gs
Install the WebUI of Open5GS
The WebUI allows you to interactively edit subscriber data. Node.js is required to install the WebUI of Open5GS:
sudo apt update
sudo apt install -y ca-certificates curl gnupg
sudo mkdir -p /etc/apt/keyrings
curl -fsSL https://deb.nodesource.com/gpgkey/nodesource-repo.gpg.key | sudo gpg --dearmor -o /etc/apt/keyrings/nodesource.gpg

NODE_MAJOR=20
echo "deb [signed-by=/etc/apt/keyrings/nodesource.gpg] https://deb.nodesource.com/node_$NODE_MAJOR.x nodistro main" | sudo tee /etc/apt/sources.list.d/nodesource.list

sudo apt update
sudo apt install nodejs -y

sudo zypper install nodejs8

curl -fsSL https://open5gs.org/open5gs/assets/webui/install | sudo -E bash -
Step 2: Configure the 5G Core (Open5GS)
IP:port addresses
The default configurations see all of the Open5GS components fully configured for use on a single computer using the local loopback address space (127.0.0.X):
MongoDB   = 127.0.0.1 (subscriber data) - http://localhost:9999

MME-s1ap  = 127.0.0.2 :36412 for S1-MME
MME-gtpc  = 127.0.0.2 :2123 for S11
MME-frDi  = 127.0.0.2 :3868 for S6a

SGWC-gtpc = 127.0.0.3 :2123 for S11
SGWC-pfcp = 127.0.0.3 :8805 for Sxa

SMF-gtpc  = 127.0.0.4 :2123 for S5c
SMF-gtpu  = 127.0.0.4 :2152 for N4u (Sxu)
SMF-pfcp  = 127.0.0.4 :8805 for N4 (Sxb)
SMF-frDi  = 127.0.0.4 :3868 for Gx auth
SMF-sbi   = 127.0.0.4 :7777 for 5G SBI (N7,N10,N11)

AMF-ngap  = 127.0.0.5 :38412 for N2
AMF-sbi   = 127.0.0.5 :7777 for 5G SBI (N8,N12,N11)

SGWU-pfcp = 127.0.0.6 :8805 for Sxa
SGWU-gtpu = 127.0.0.6 :2152 for S1-U, S5u

UPF-pfcp  = 127.0.0.7 :8805 for N4 (Sxb)
UPF-gtpu  = 127.0.0.7 :2152 for S5u, N3, N4u (Sxu)

HSS-frDi  = 127.0.0.8 :3868 for S6a, Cx

PCRF-frDi = 127.0.0.9 :3868 for Gx

NRF-sbi   = 127.0.0.10:7777 for 5G SBI
SCP-sbi   = 127.0.0.200:7777 for 5G SBI
SEPP-sbi  = 127.0.0.250:7777 for 5G SBI
SEPP-n32  = 127.0.0.251:7777 for 5G N32
SEPP-n32f = 127.0.0.252:7777 for 5G N32-f
AUSF-sbi  = 127.0.0.11:7777 for 5G SBI
UDM-sbi   = 127.0.0.12:7777 for 5G SBI
PCF-sbi   = 127.0.0.13:7777 for 5G SBI
NSSF-sbi  = 127.0.0.14:7777 for 5G SBI
BSF-sbi   = 127.0.0.15:7777 for 5G SBI
UDR-sbi   = 127.0.0.20:7777 for 5G SBI
PLMN ID and TAC information
Our setup will be using PLMN ID (MCC/MNC) 001/01 and TAC 7. This information needs to be loaded into the NRF and AMF config files (and the gNB).
Modify /etc/open5gs/nrf.yaml to set the Serving PLMN ID:
nrf:
  serving:  # 5G roaming requires PLMN in NRF
    - plmn_id:
        mcc: 001
        mnc: 01
  sbi:
    server:
      - address: 127.0.0.10
        port: 7777
Modify /etc/open5gs/amf.yaml to set the PLMN ID and TAC:
amf:
  sbi:
    server:
      - address: 127.0.0.5
        port: 7777
    client:
#      nrf:
#        - uri: http://127.0.0.10:7777
      scp:
        - uri: http://127.0.0.200:7777
  ngap:
    server:
      - address: 127.0.0.5
  metrics:
    server:
      - address: 127.0.0.5
        port: 9090
  guami:
    - plmn_id:
        mcc: 001
        mnc: 01
      amf_id:
        region: 2
        set: 1
  tai:
    - plmn_id:
        mcc: 001
        mnc: 01
      tac: 7
  plmn_support:
    - plmn_id:
        mcc: 001
        mnc: 01
      s_nssai:
        - sst: 1
  security:
    integrity_order : [ NIA2, NIA1, NIA0 ]
    ciphering_order : [ NEA0, NEA1, NEA2 ]
  network_name:
    full: 5GMAG
    short: 5GMAG
After changing config files, please restart Open5GS daemons.
sudo systemctl restart open5gs-nrfd
sudo systemctl restart open5gs-amfd
Adding a route for the UE to have WAN connectivity
In order to bridge between the PGWU/UPF and WAN (Internet), you must enable IP forwarding and add a NAT rule to your IP Tables.
To enable forwarding and add the NAT rule, enter:
Enable IPv4/IPv6 Forwarding
sudo sysctl -w net.ipv4.ip_forward=1
sudo sysctl -w net.ipv6.conf.all.forwarding=1
Add NAT Rule
sudo iptables -t nat -A POSTROUTING -s 10.45.0.0/16 ! -o ogstun -j MASQUERADE
sudo ip6tables -t nat -A POSTROUTING -s 2001:db8:cafe::/48 ! -o ogstun -j MASQUERADE
Configure the firewall correctly. Some operating systems (Ubuntu) by default enable firewall rules to block traffic.
sudo ufw disable
gNB installation and configuration
Follow the installation procedures in the srsRAN installation guide.
Step 1: Install the gNB (srsRAN)
Install dependencies
sudo apt-get install cmake make gcc g++ pkg-config libfftw3-dev libmbedtls-dev libsctp-dev libyaml-cpp-dev libgtest-dev
Install UHD drivers (e.g. for Ettus USRP)
sudo add-apt-repository ppa:ettusresearch/uhd
sudo apt-get update
sudo apt-get install libuhd-dev uhd-host
Download the srsRAN Project packages:
sudo add-apt-repository ppa:softwareradiosystems/srsran-project
sudo apt-get update
sudo apt-get install srsran-project -y
Step 2: Configure the gNB (srsRAN)
Prepare the system
Before running srsRAN Project applications, we recommend tuning your system for best performance:
sudo ./scripts/srsran_performance
Configuration files
When installed from packages, srsRAN Project example configs can be found in /usr/share/srsran.
We’ve created the following 5gmag_example.yml. We recommend finding the value ARFCN through this link.
# This example configuration outlines how to configure the srsRAN Project gNB to create a single TDD cell
# transmitting in band 77, with 10 MHz bandwidth and 30 kHz sub-carrier-spacing. A USRP X310 is configured
# as the RF frontend. Note in this example the internal GPDSO is used.

amf:
  addr: 127.0.0.5                     # The address or hostname of the AMF.
  bind_addr: 127.0.1.5                # A local IP that the gNB binds to for traffic from the AMF.

ru_sdr:
  device_driver: uhd                  # The RF driver name.
  device_args: send_frame_size=1472,recv_frame_size=1472,type=x300              # Optionally pass arguments to the selected RF driver.
  clock: gpsdo                        # Specify the clock source used by the RF.
  srate: 15.36                        # RF sample rate might need to be adjusted according to selected bandwidth.
  tx_gain: 20                         # Transmit gain of the RF might need to adjusted to the given situation.
  rx_gain: 20                         # Receive gain of the RF might need to adjusted to the given situation.

cell_cfg:
  dl_arfcn: 653668                    # ARFCN of the downlink carrier (center frequency).
  band: 77                            # The NR band.
  channel_bandwidth_MHz: 10           # Bandwith in MHz. Number of PRBs will be automatically derived.
  common_scs: 30                      # Subcarrier spacing in kHz used for data.
  plmn: "00101"                       # PLMN broadcasted by the gNB.
  tac: 7                              # Tracking area code (needs to match the core configuration).
  pci: 1                              # Physical cell ID.

log:
  filename: /tmp/gnb.log              # Path of the log file.
  all_level: info                     # Logging level applied to all layers.

pcap:
  mac_enable: false                   # Set to true to enable MAC-layer PCAPs.
  mac_filename: /tmp/gnb_mac.pcap     # Path where the MAC PCAP is stored.
  ngap_enable: false                  # Set to true to enable NGAP PCAPs.
  ngap_filename: /tmp/gnb_ngap.pcap   # Path where the NGAP PCAP is stored.
Optional: Adding an external GPS reference clock
Ideally the USRPs should be connected to a 10 MHz external reference clock or GPSDO, although this is not a strict requirement. In our tests, many COTS UEs were only able to connect to the gNB when using an external reference clock. If this is the case, we recommend using the Leo Bodnar GPSDO for that purpose.
To configure the Leo Bodnar GPSDO follow the How to Use instructions on the website. If the configuration is done on MacOSX the configuration Software looks like this:
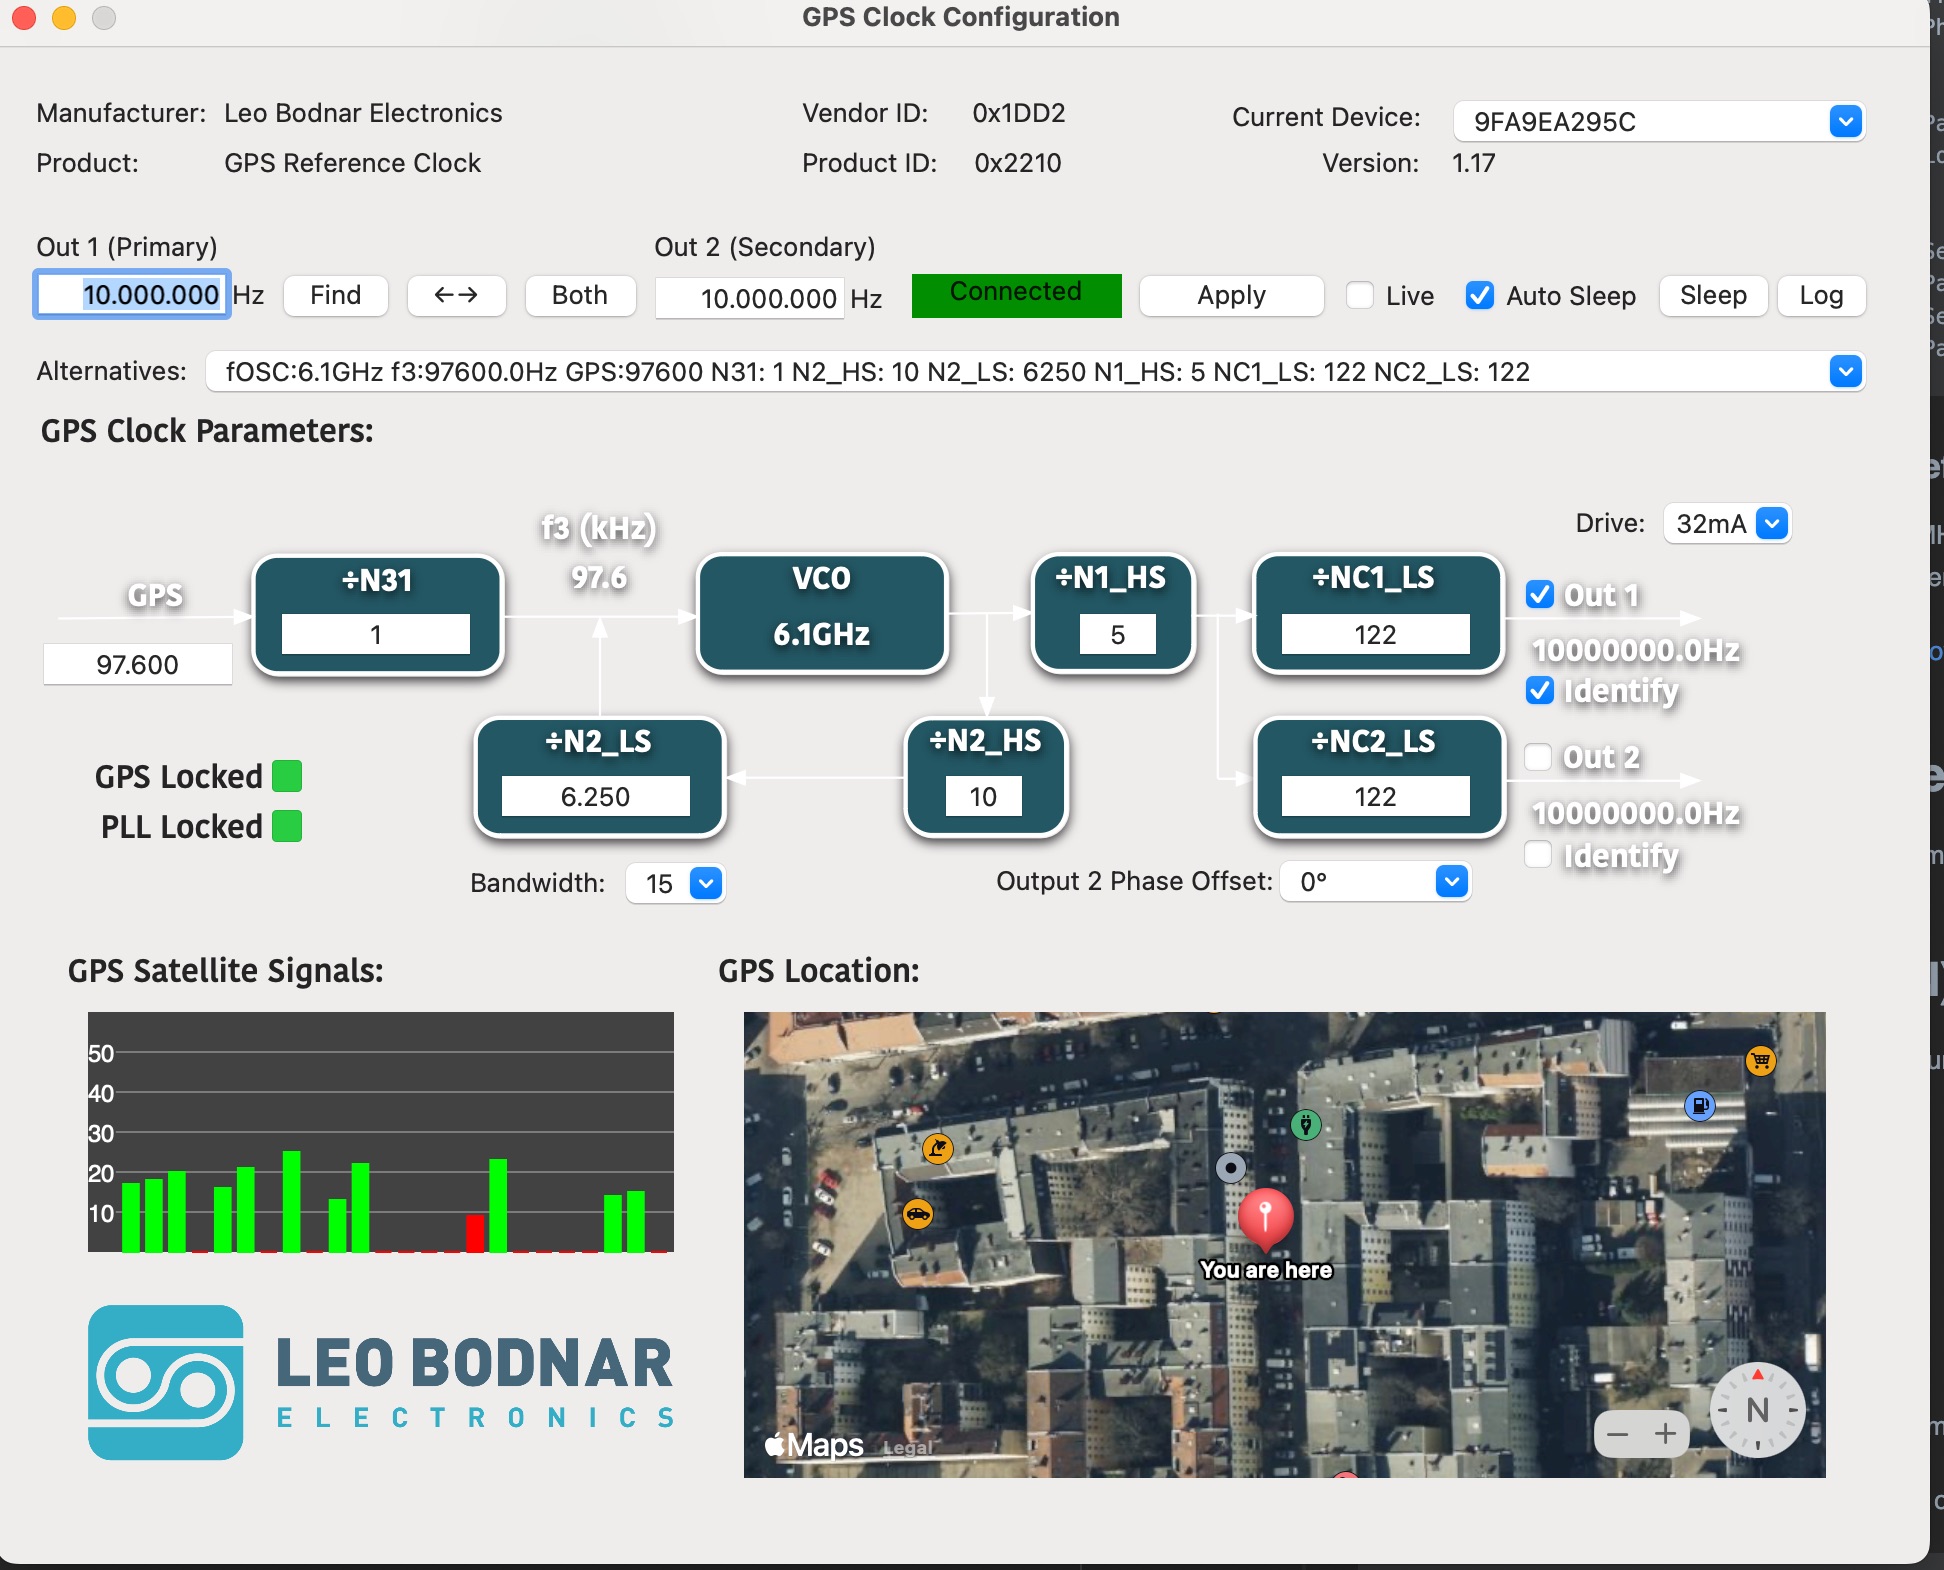
After the GPS signal is locked connect output of the reference clock to your USRP device. For that reason, connect the output plug of the reference clock to the REF IN connector on the USRP.
Finally adjust the configuration of the srsRAN Project gNB to use an external clock reference:
ru_sdr:
  device_driver: uhd                  # The RF driver name.
  device_args: send_frame_size=1472,recv_frame_size=1472,type=x300              # Optionally pass arguments to the selected RF driver.
  clock: external                     # Specify the clock source used by the RF.
  srate: 15.36                        # RF sample rate might need to be adjusted according to selected bandwidth.
  tx_gain: 20                         # Transmit gain of the RF might need to adjusted to the given situation.
  rx_gain: 20                         # Receive gain of the RF might need to adjusted to the given situation.
Running the 5G Core (Open5GS)
When you install the software using the package manager, it is setup to run as a systemd service.
Running the gNB (srsRAN)
Run the gNB as follows, passing the YAML configuration file:
sudo ./gnb -c 5gmag_example.yml
Configure the COTS UE
Register Subscriber Information
Connect to http://localhost:9999 and login with admin account. Username : admin Password : 1423
To add subscriber information, you can do WebUI operations in the following order:
Go to Subscriber Menu.
Click + Button to add a new subscriber.
Fill the IMSI, security context(K, OPc, AMF), and APN of the subscriber.
Click SAVE Button
Enter the subscriber details of your SIM cards using this tool, to save the subscriber profile in the HSS and UDR MongoDB database backend.
SIM card and APN
Insert your SIM card to the UE and set the UE’s APN to match the APN you configured in the Open5GS WebUI. We recommend to edit the existing APN. Toggle the UE in and out of flight mode. If it doesn’t automatically connect, try manually searching for a network. If the PLMN set on the SIM card does not match the PLMN being used by the radio, you will need to ensure ‘data roaming’ on the UE is switched on.
The UE should connect automatically. If you experience trouble, we recommend checking the 5G Core logs, e.g.:
sudo tail -f /var/log/open5gs/amf.log