MPEG-I Scene Description Test Asset Creation
- MPEG-I Scene Description Test Asset Creation
- List of available assets
- Generation of MPEG-I SD compliant glTF2.0 assets
Content repositories
5G-MAG is hosting a repository with test assets implementing some of the core extensions defined in MPEG-I Scene Description (ISO/IEC 23090-14): https://github.com/5G-MAG/rt-xr-content.
Note the assets produced by the MPEG-I SD group are typically available for download at https://standards.iso.org/iso-iec/23090/-24/. Khronos hosts sample glTF2.0 assets on GitHub: https://github.com/KhronosGroup/glTF-Sample-Assets.git.
Blender add-on to generate MPEG-I SD compliant glTF2.0 assets
The 5G-MAG Reference Tools also provides a Blender add-on to support MPEG_* glTF extensions and export glTF files.
The repository is available here: https://github.com/5G-MAG/rt-xr-blender-exporter A tutorial is available here: Blender glTF Exporter and Unity Player
List of available assets
MPEG_anchor
The MPEG_anchor glTF extension enables anchoring nodes and scenes to features (Trackable) tracked by the XR device.
| Trackable type | Test content |
|---|---|
| TRACKABLE_VIEWER | anchoring/anchorTest_viewer_n.gltf |
| TRACKABLE_FLOOR | awards/scene_floor_anchoring.gltf |
| TRACKABLE_PLANE | awards/scene_plane_anchoring.gltf |
| TRACKABLE_CONTROLLER | anchoring/anchorTest_ctrl_n.gltf |
| TRACKABLE_MARKER_2D | anchoring/anchorTest_m2D_n.gltf |
| TRACKABLE_MARKER_3D | anchoring/anchorTest_m3D_n.gltf |
| TRACKABLE_MARKER_GEO | anchoring/anchorTest_geoSpatial_n_cs.gltf |
| TRACKABLE_APPLICATION | anchoring/anchorTest_app_n.gltf |
MPEG_scene_interactivity and MPEG_node_interactivity
Behaviors in a 3D scene can be defined through the MPEG_scene_interactivity and MPEG_node_interactivity glTF extensions. An interactivity behavior combines one or more triggers that condition the execution of one or more actions.
| Trigger type | Test content |
|---|---|
| TRIGGER_COLLISION | gravity/gravity.gltf |
| TRIGGER_PROXIMITY | gravity/gravity.gltf, geometry/UseCase_03-variant1-geometry.gltf |
| TRIGGER_USER_INPUT | gravity/gravity.gltf, geometry/UseCase_03-variant3-geometry.gltf |
| TRIGGER_VISIBILITY | geometry/UseCase_03-variant3-geometry.gltf |
| Action type | Test content |
|---|---|
| ACTION_ACTIVATE | gravity/gravity.gltf |
| ACTION_TRANSFORM | gravity/gravity.gltf |
| ACTION_BLOCK | gravity/gravity.gltf |
| ACTION_ANIMATION | geometry/UseCase_03-variant1-geometry.gltf |
| ACTION_SET_MATERIAL | gravity/gravity.gltf |
| ACTION_MANIPULATE | |
| ACTION_MEDIA | geometry/UseCase_02-variant3-geometry.gltf |
| ACTION_HAPTIC | |
| ACTION_SET_AVATAR |
MPEG_media, MPEG_accessor_timer, MPEG_buffer_circular
Support for media sources (eg. mp4, dash, rtp, …) exposing media buffers to the presentation engine through the MPEG_media, MPEG_accessor_timer, MPEG_buffer_circular glTF extensions.
Sample scene with media pipelines
MPEG_texture_video
Supports video textures buffers through the MPEG_texture_video glTF video extension. Video decoding is implemented by media pipelines.
Sample scene with video texture
MPEG_audio_spatial
Supports audio sources positionned in 3D through the MPEG_audio_spatial. For each audio source the extension specifies attenuation parameters controling the audio source loudness as a function of the viewer’s distance.
Sample scene with spatial audio source
Generation of MPEG-I SD compliant glTF2.0 assets
MPEG_anchor
Configure anchoring of a node
- select the node to be anchored
- locate the XR Anchoring panel in object properties, select an anchor type and configure the anchor
The following anchor types can be configured:
- TRACKABLE_FLOOR
- TRACKABLE_VIEWER
- TRACKABLE_CONTROLLER
- TRACKABLE_PLANE
- TRACKABLE_MARKER_2D
- TRACKABLE_MARKER_GEO
- TRACKABLE_APPLICATION
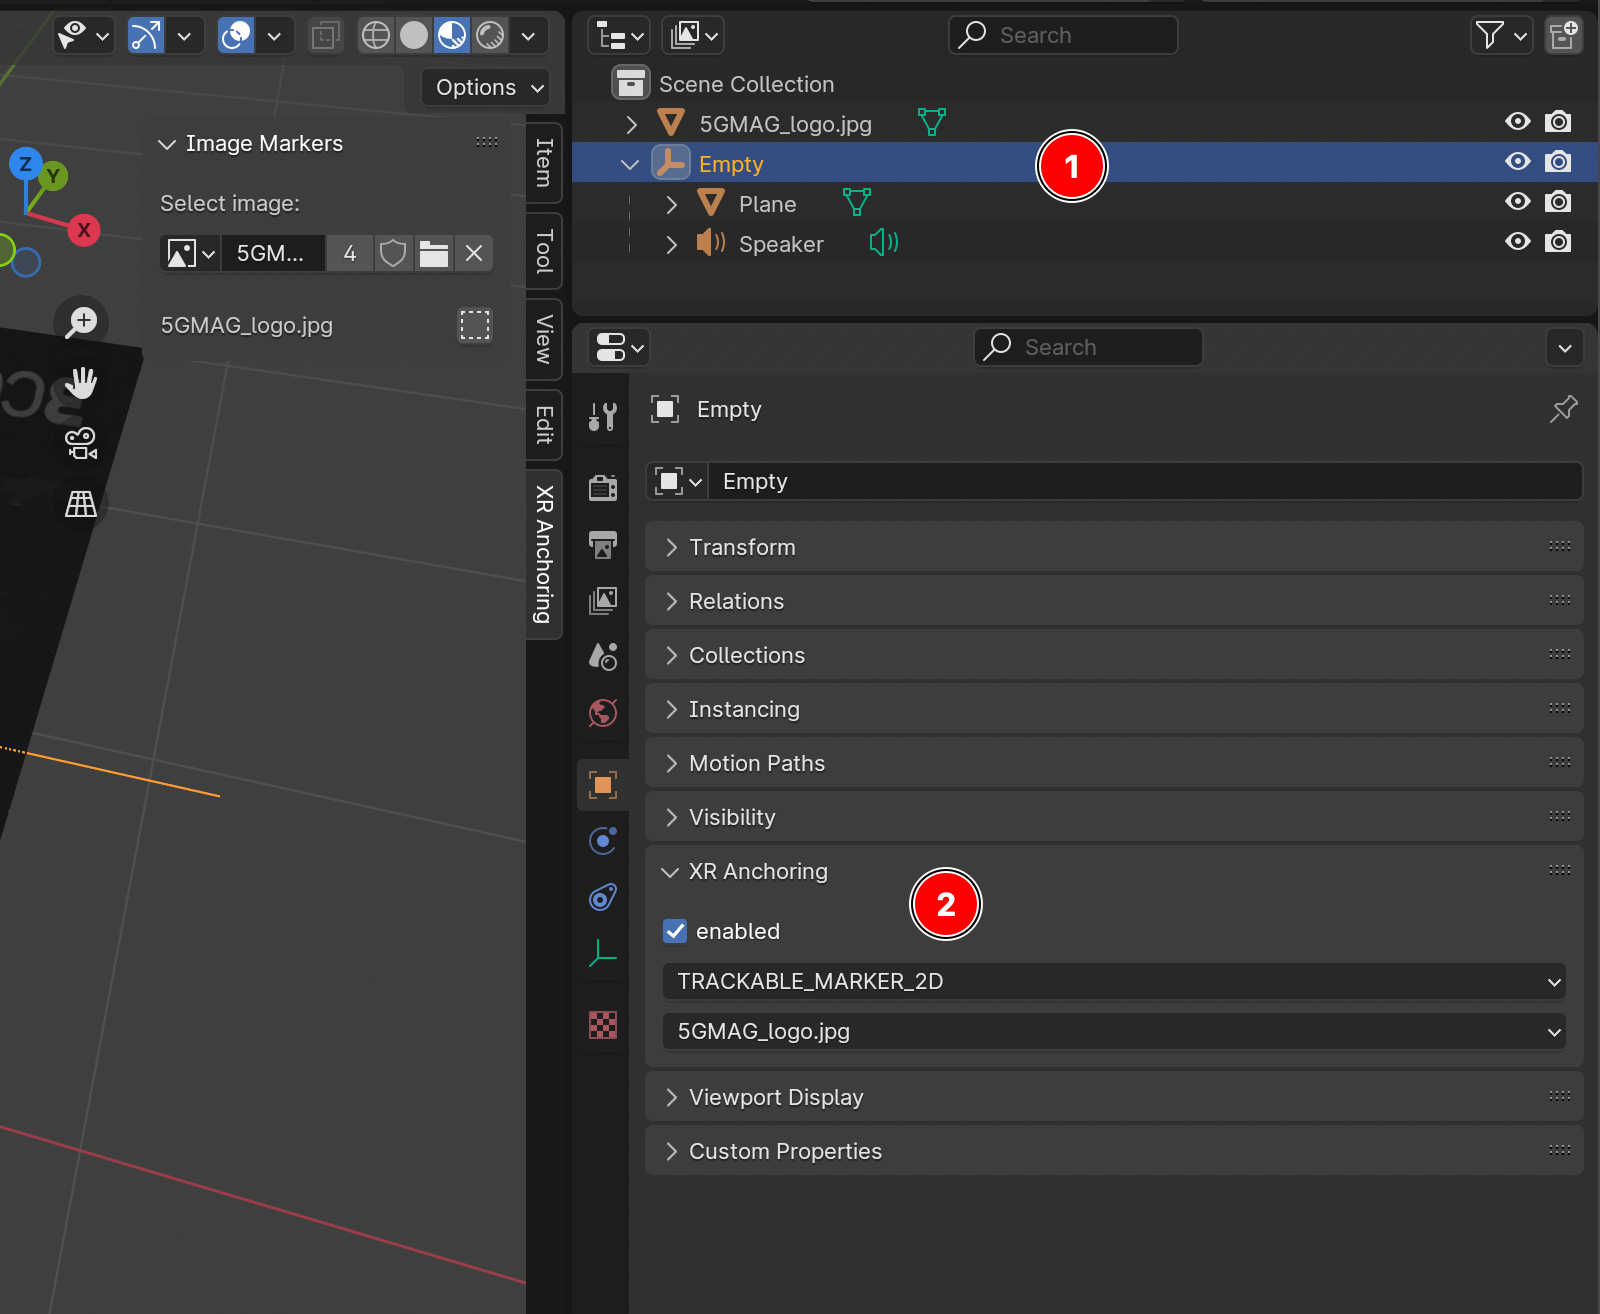
Creating a 2D marker node
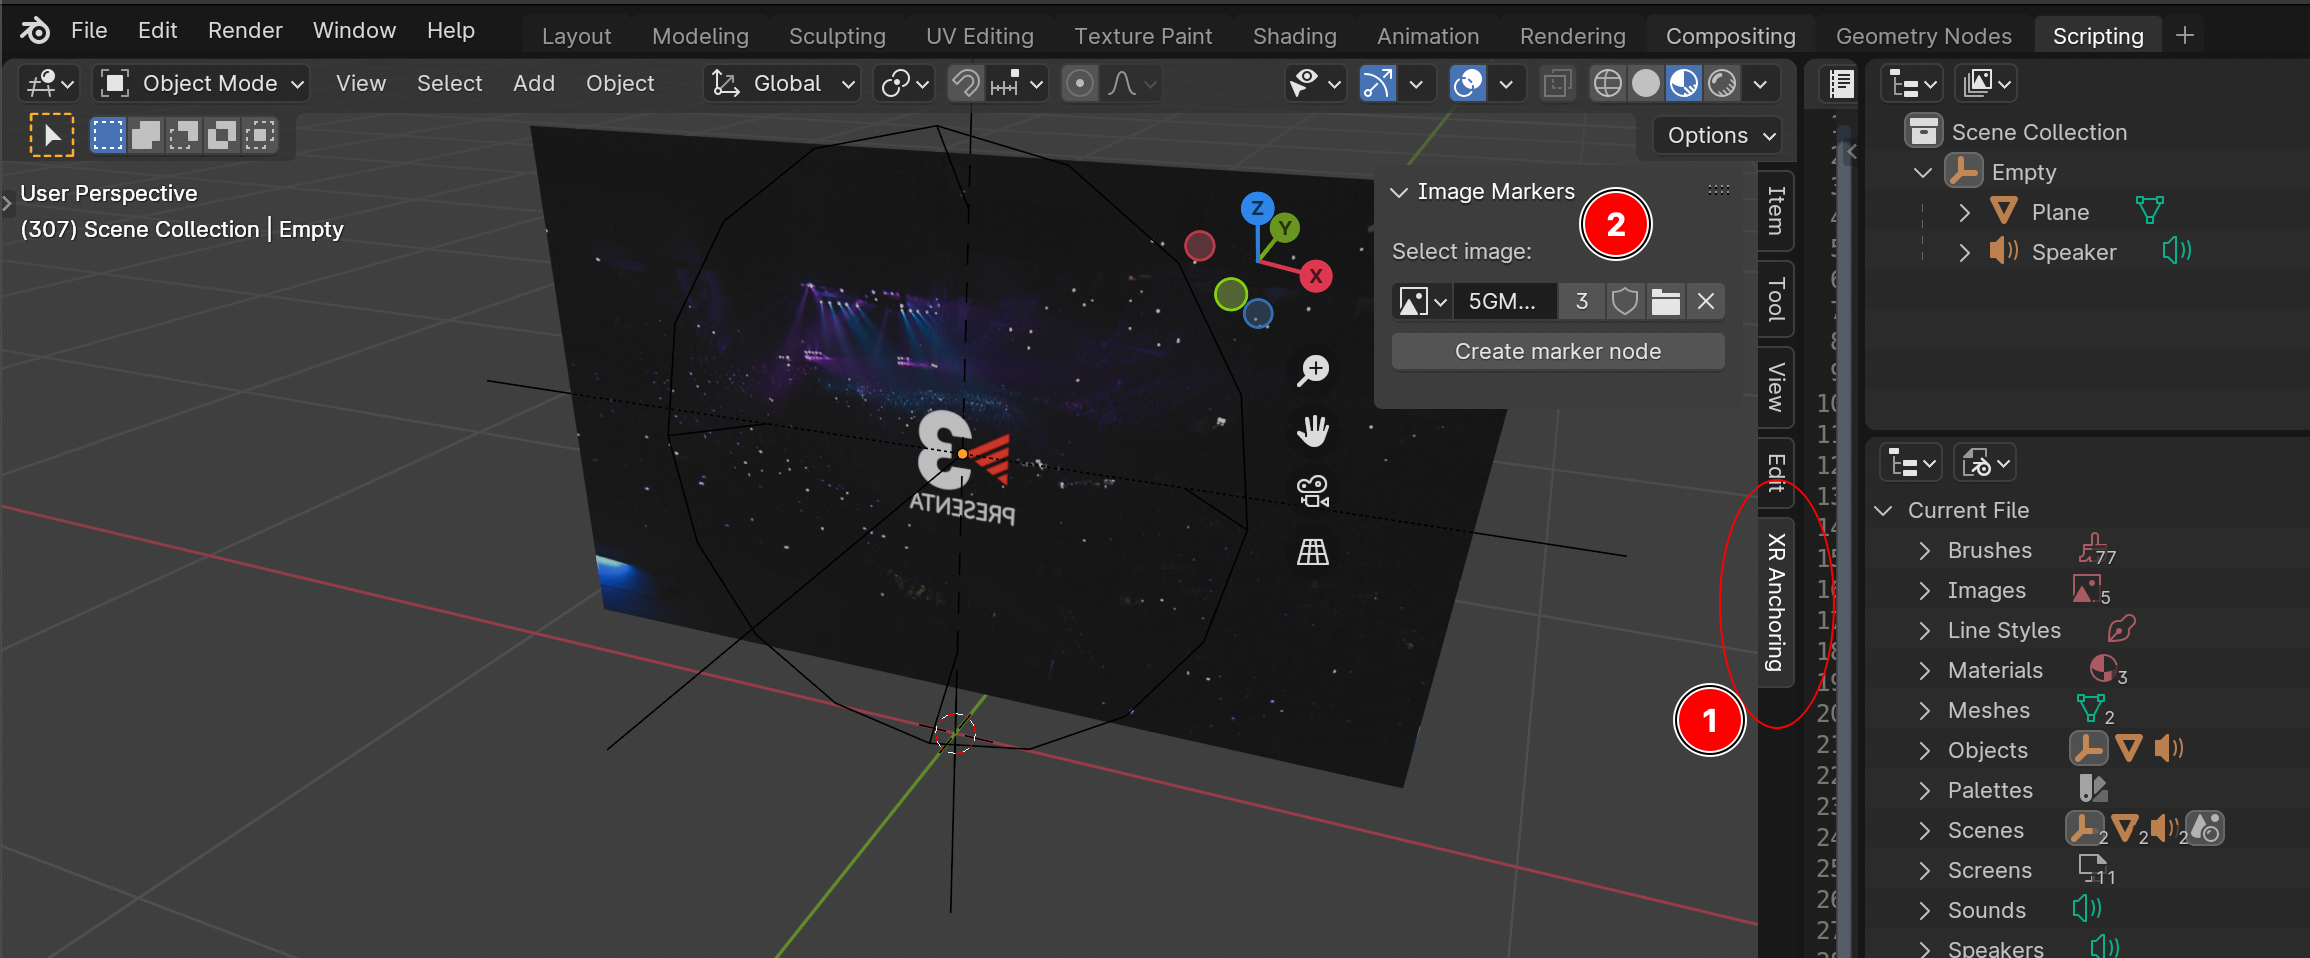
- locate the XR Anchoring panel (press N while the UI is focused on the 3D view)
- select an image and hit ‘create marker node’, the marker 2D node is added to the scene and can now be used to configure an anchor
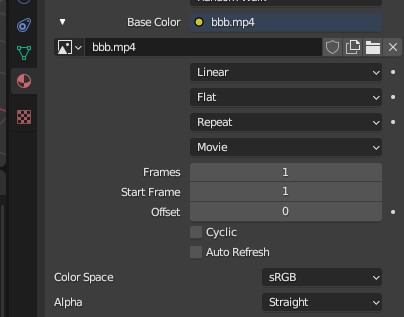
MPEG_texture_video
To add a video and export it as MPEG_texture_video, first make sure that the blender’s scene output format matches the framerate of the videos used as texture.
- Create or select a material
- Select the shader slot which will be using the video, and make it an ‘Image texture’
- Open or Select the video to use
All Image textures with a movie source are exported as MPEG_texture_video extensions:
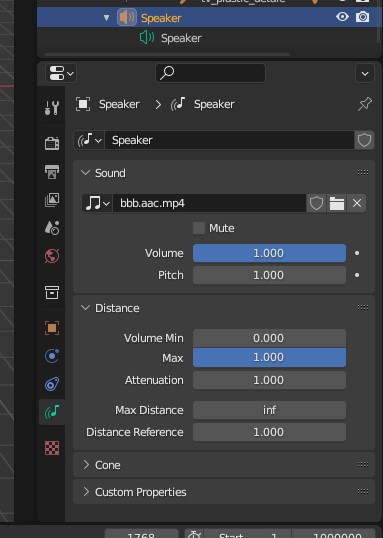
MPEG_audio_spatial
Audio sources
To add an audio source to the scene:
- Add a Speaker node to the scene: 3D Viewport > Add > Speaker
- Add a file source to the speaker’s Sound. The file is assumed to contain a single channel of audio (MONO).
- Configure speaker’s Distance parameters:
- Max Distance
- Attenuation (roll-off factor)
- Distance Reference All other parameters are ignored.
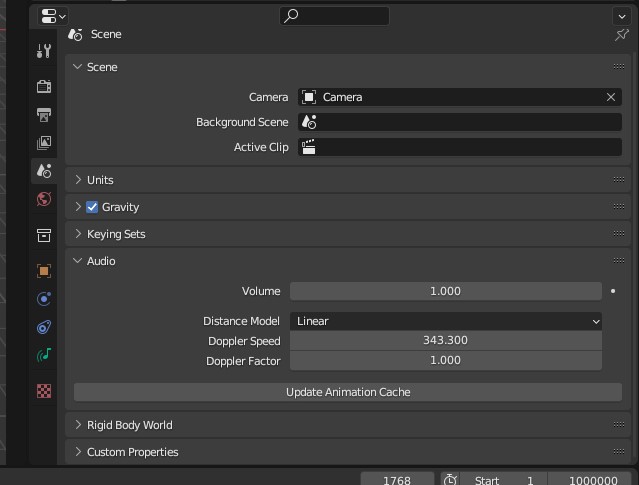
The audio attenuation model is configured as a scene property in Blender.